Friday, May 4, 2018

my elopement + handmade wedding dress


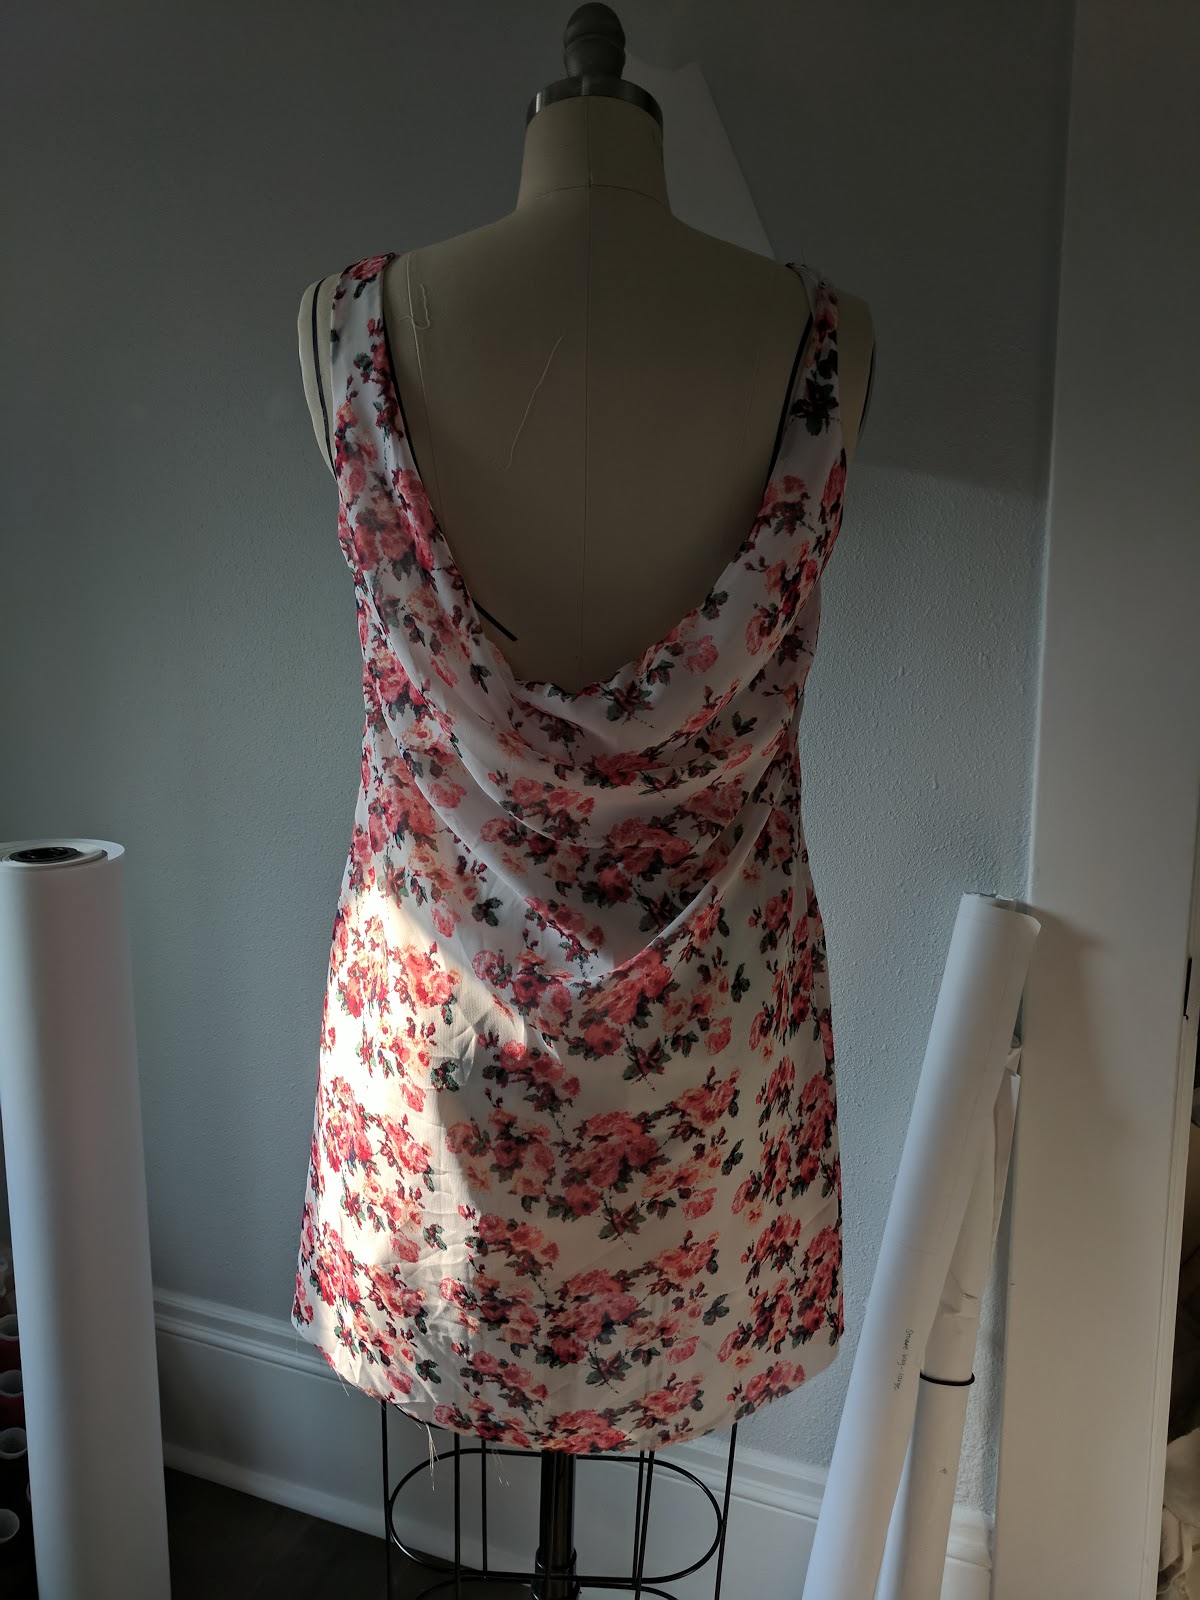
So, here's the kind of person I am: the kind that puts off planning my elopement for most of a year, finally picks a date two months in advance, orders (and then ignores) a bunch of silk swatches from Mood, and then completely decides to not think about the dress I'm going to make until three weeks before the wedding day. Once the three week mark hit, I began panicking about how I had absolutely no idea what I wanted the dress to look like at allllll, forced myself to iterate through several designs and fittings that just didn't do it for me, and eventually settled on a bodice front, bodice back, and skirt (all designed during different stages of the process). Then I ordered final fabric from across the country 11 days before the big day, overcame a few more unexpected and major design and fit hurdles, and then sewed the entire final dress up in 2 days (with 2 more partial days of hand hemming, the worst task) - done, with a dress I loved, with 4 days to spare! Phew. It was completely stressful, but honestly that kind of pressure makes me feel the happiest and most alive, and I can't imagine having attempted this big, meaningful project any other way.


A little more about our wedding day: Tim and I finally decided to get married after almost 8 years together. Practical maybe to a fault, we put it off indefinitely while we were both in tech, and once I quit my job we decided it finally made sense for both tax and health insurance reasons (and, you know, the fact that we're in love and had been together for the better part of a decade and had no intention of ever breaking up). Hopeless romantics obviously. But we did decide to make this a day we would look back on lovingly - no extended family drama, no 200-person guest list or caterer or florist or venue to stress over. And our parents were amazingly supportive despite not having an invite. We decided to run off to the woods outside of Portland, bringing along 2 of our oldest and closest friends, our corgi Tumbles, and a photographer slash witness to the ceremony (who I met in person on my Wildbride retreat a couple of years ago, and who had the perfect aesthetic for our chilly PNW woods elopement). I honestly expected at least something to go horribly wrong - freezing rain driving us all back home after 20 minutes seemed the most likely culprit. But honestly the day was pretty much everything I could have hoped for? The dress worked out, the rain held off, the photos are amazing, and our friend Phil's internet ordainment totally took and we ended up legally married :)

Here are some of my fav photos from the day, all taken by Liz Morrow (who I believe is out of the photography biz now, and I'm forever grateful she come down to take these before shifting career paths!).


For the sewists (or just the curious) out there, here's a bit more info about the dress:

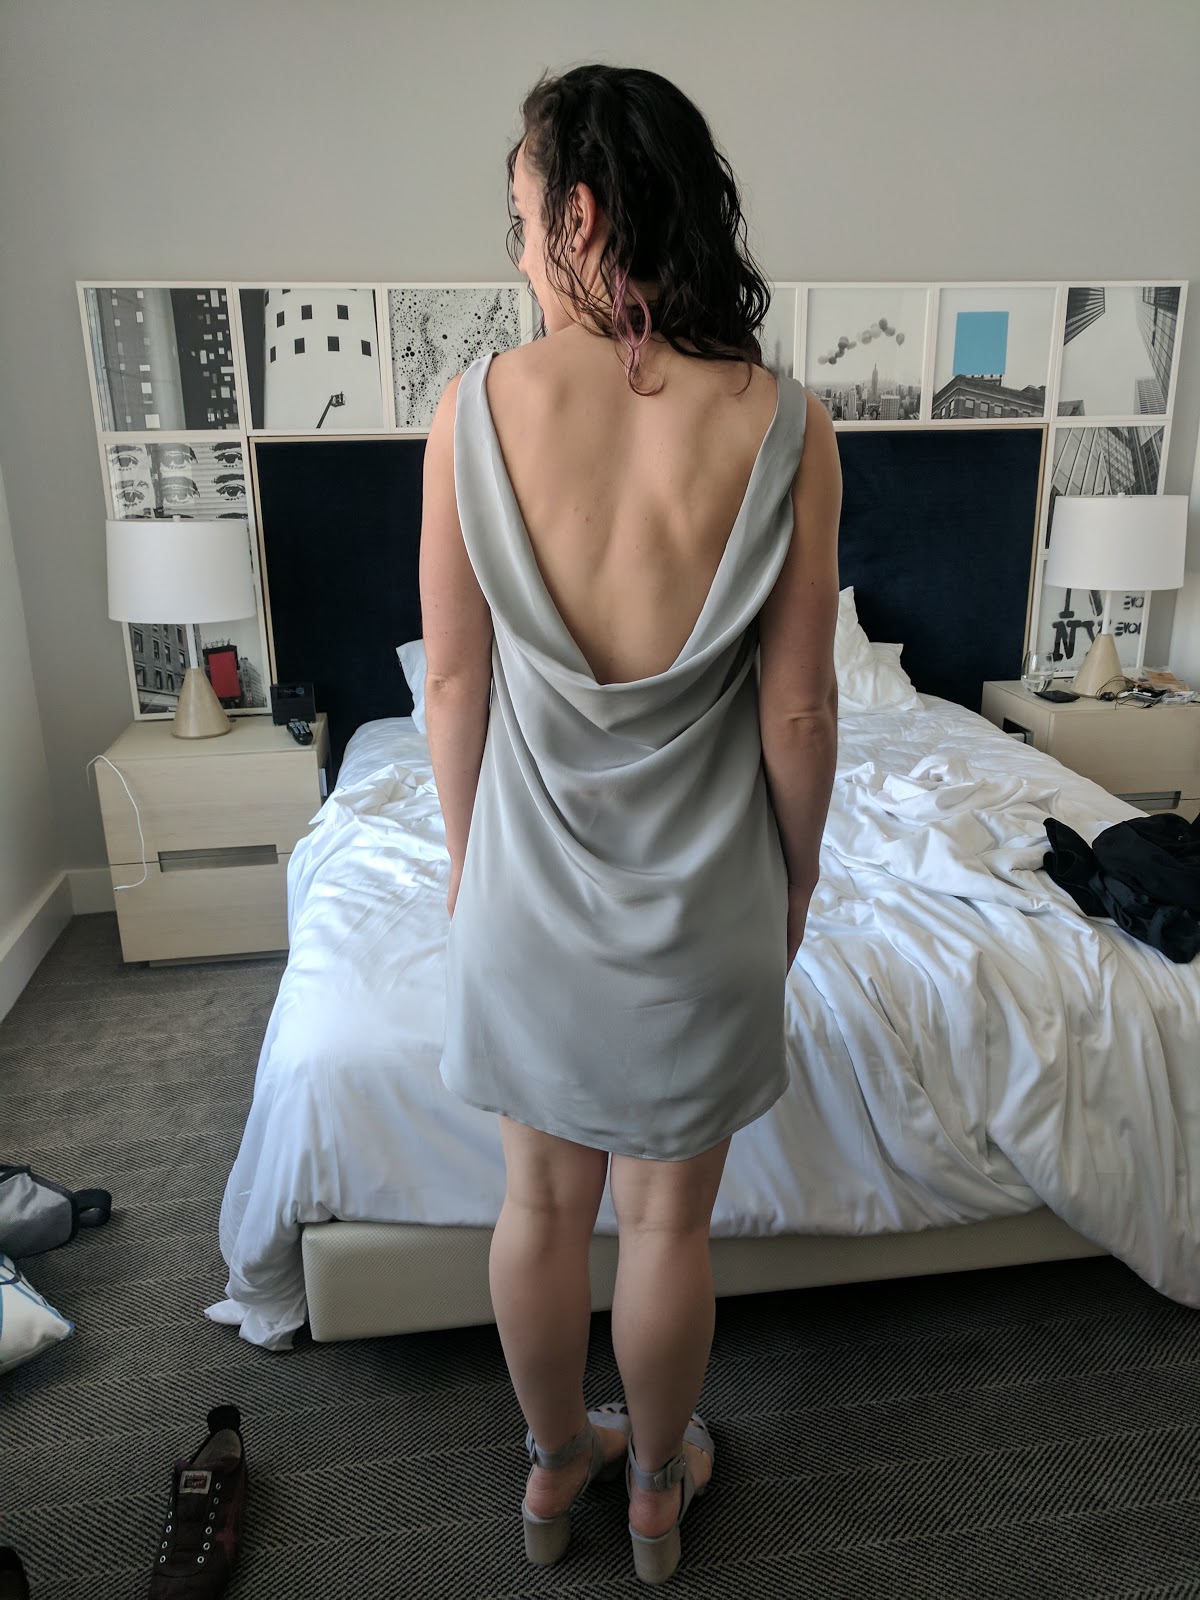
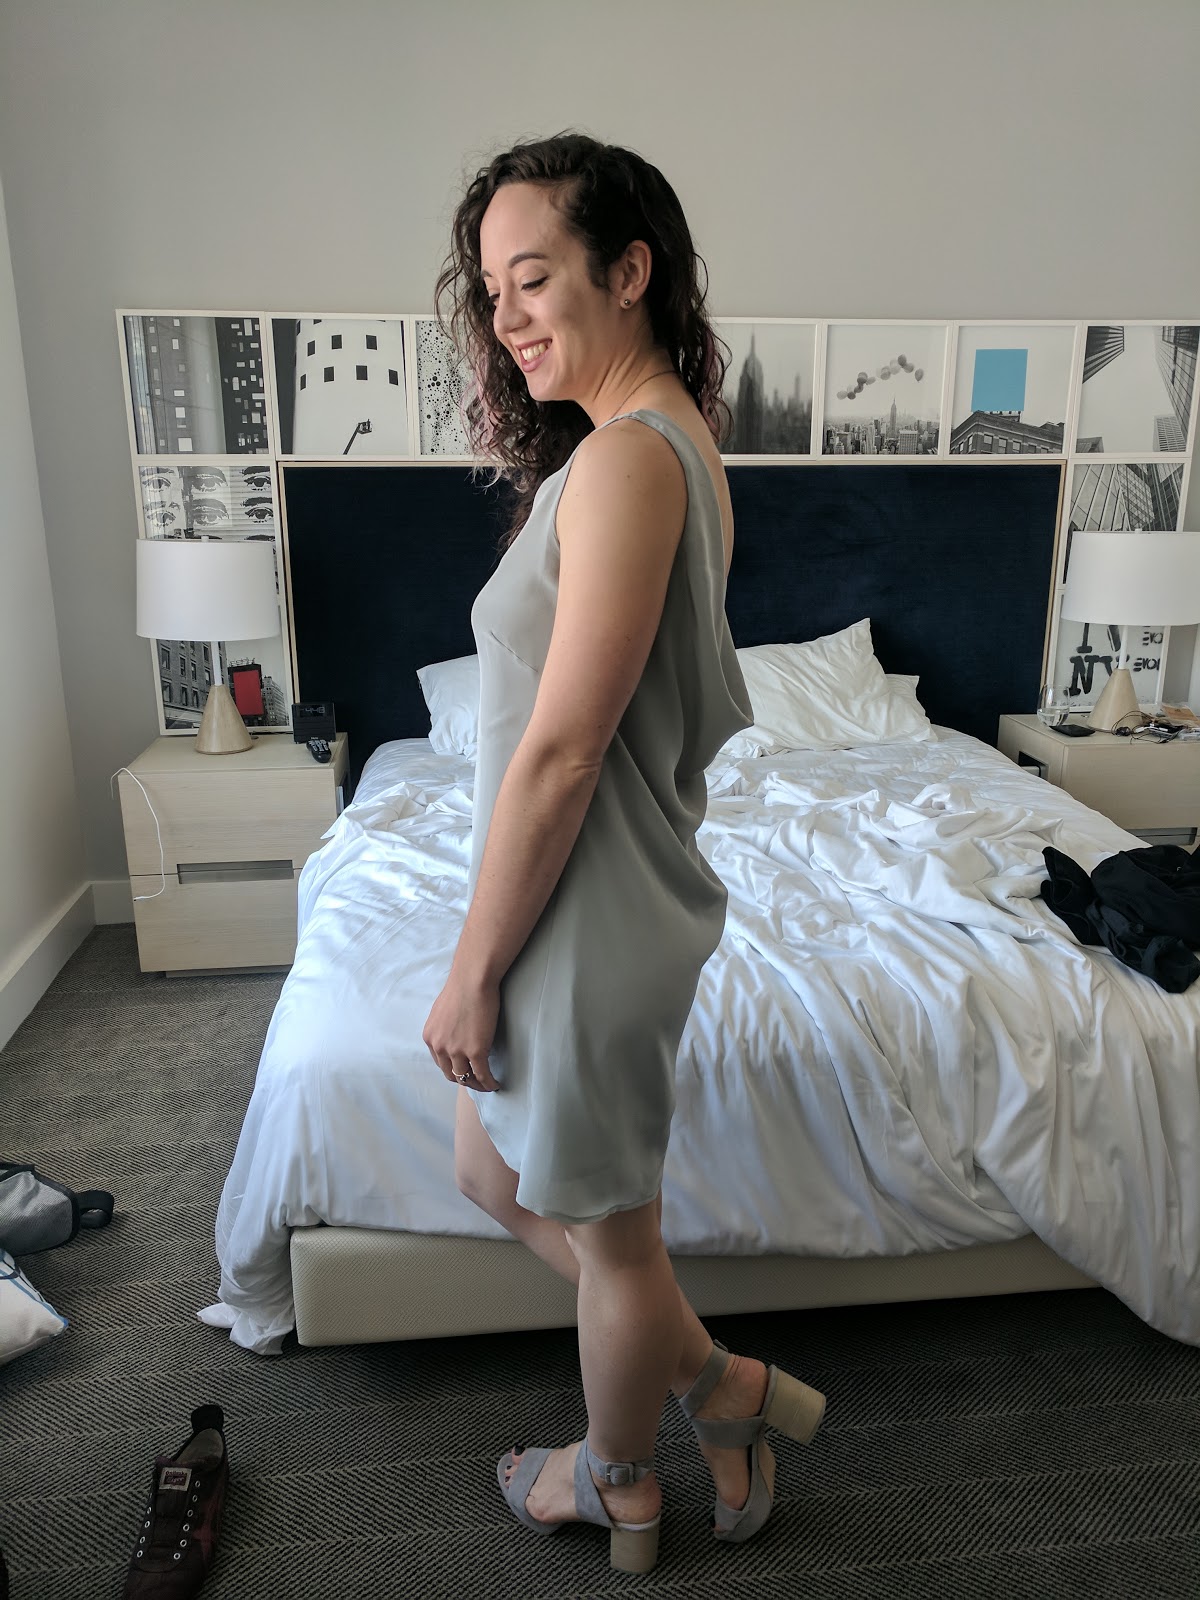
My wedding dress was totally designed, drafted, fit, and sewn up by me. It's made with 3 kinds of silk: a charmeuse bodice with organza sheer panels on the front and back, chiffon skirt with organza hem facings, and even more organza used as underlining and sew-in interfacing for the zipper. All silk was ordered from Mood in the deep charcoal colorway. I also used flannel to underline the bodice to give it more structure, since I wouldn't be wearing a bra with the dress. I started off with my custom bodice sloper and iterated... and iterated.. and iterated. Lots of muslin and then cheap poly versions of my silks, and finally the real deal. There were a few terrifying parts during construction: trying to sew the angles of the sheer bodice panels without any creasing, turning the charmeuse straps out through the points of the back bodice, inserting an invisible zipper into two layers of delicate silk chiffon. But even though the process was full of indecision and iteration, it was surprisingly devoid of full on disasters, much like the wedding day itself! I really truly loved making this dress and am honestly thinking about having a one year anniversary party just so I can wear it one more time :) I actually considered going into the bespoke wedding dress field for like 2 seconds, but a huge part of the joy in this was knowing I had no one to please but myself. I just can't imagine dealing with brides and wedding stress that isn't my own. But for me, this project was the perfect way to celebrate my wedding day.


Monday, December 18, 2017

2017 roundup: cowl-back silk dress


If you were following along last December, you may recall that I was invited to a wedding and had nothing to wear, so I sewed a dress using a vintage Vogue pattern (more on that here and here). Here's the thing about me and sewing: until this fall, I still disliked a fairly large percentage of what I made, either because the construction just wasn't quite where I wanted it to be, or (more often) because the fabric, silhouette, and overall look just ended up not being my style. I think this is a fairly normal process to go through as you get used to the freedom of being able to design and sew literally anything you can imagine. I used to make something, wear it a few times, and then many months later have the realization that I just didn't like it, and that it certainly wasn't something I would be interested in buying if I saw it in a store. Fortunately that process seemed to get quicker every time, going from months to days, and I think I'm finally getting to the point where I can plan and make something I do actually like and want to wear. Back to last year's dress: I was honestly really excited about it when I wore it to the wedding, and I don't think it looked bad. But looking back at pictures after the fact, I realized it was less of a muted gray color (what I had envisioned) and more metallic gunmetal. The almost foil-like sheen is a lot and isn't what I was going for. And I've realized this year that I'm just not as into the vintage fit-and-flare look as I used to be, even though I think it complements my body type very well. There's more to dressing than just showing off our best assets, amirite?

Given all of that, and the fact that one side of the bodice started to rip open and I don't know if there is enough seam allowance to successfully mend it, I decided to take what I learned about patternmaking, construction, and my ever-evolving personal style and make a new dress for some summer weddings earlier this year.

I went back and forth on what I wanted the dress to look like for a long time. I originally wanted to do a silk version of the rayon maxi dress I drafted and sewed for class back in February, with an added slit up one leg for a little more glamour. (I apparently never posted a photo of the dress on! In large part because I feel like my construction was subpar. But the technical sketch is here.) I of course went back and forth until the weekend before wedding #1, leaving myself very little time to figure out fabric and create the whole dress. I decided to look for a silk crepe, and I headed to a local fabric store that has ends of bolts for lots of pretty silk. Unfortunately, I only found a few colors that I really liked against my skin tone, and none of them had more than 2.5 yards left - not nearly enough for the long, paneled dress I planned to make. I went home and looked into ordering online, but I realized I didn't trust the photos enough to know what would look good on me, and there was definitely no time left for swatches. So I went back to the fabric store again and bought up my favorite silk, even though there were just under 2.5 yards left and I had no actual plan for the dress. I also picked out 2.5 yards of Bemberg lining and an invisible zip to match.


I wanted to make something more understated than the fit and flair look, less vintage, less complex, more room to just let the beautiful silver silk be the star. I learned from the busted side seam of my previous silk dress and planned to make this one with a looser fit, so as not to strain the delicate fabric. And I'm all about the shift dresses lately, so that was a good jumping off point. The silk deserved something that would show off its drape, and since a floor-length skirt wasn't going to be possible, I decided to put last spring's draping class to good use and use my dress form to drape a low back cowl.

I haven't yet gotten to the point of feeling comfortable draping with my final fabric, a la Project Runway, so I started with muslin. The muslin looked awful on the dress form and on me, but I knew it would regardless of whether the final fabric version was going to look good or bad - it just doesn't have the drape needed to create a nice looking cowl. I had some cheap floral poly in my stash that I'd been planning to use for a muslin eventually, so I made a second version in this to get a better idea for how the cowl would drape. I made a few tweaks from here, including lowering the back cowl for a little more drama. I made a second version in the drapey fabric to confirm my changes, and then finalized the pattern pieces, including seam allowances and updating them to not be cut on the fold.

 first muslin attempt - awful in this fabric, but good enough to try in something drapier

the polyester muslin

and some final tweaks to lower the back and change the lining + facing situation


Cutting the silk and lining was a beast. I hadn't yet built my cutting table, so I cleared off the dining room table and did my best with my rotary cutter and 2 cutting mats that weren't big enough for the pattern pieces. It took a full 2 hours to cut four pieces out (front and back of each the outer fabric and lining), but overall it was a success. I believe this was the afternoon that I vowed to finally stop putting off making that cutting table, and a month later I did it.


The sewing part actually wasn't bad, even with slippery fabrics. My still new Bernina helped a ton, as did its walking foot and straight stitch plate (a plate under the presser foot with a small hole instead of a wide rectangle opening - it means I can't move my needle or do zig zag stitches with that plate on, but it makes it much less likely that delicate fabric will get pushed down into the machine).

With only 4 pieces, sewing was mostly straightforward, although the cowl and lack of back zipper made things a little interesting. The cowl's facing (part of the outer fabric piece that folds under to the inside of the dress) is shaped so that the back lining doesn't actually reach the shoulders. I had figured this construction out on a muslin first so it wasn't totally confusing when I sewed the real thing, but it was still pretty tricky, and I when I look too closely I worry that one back shoulder doesn't lay totally flat. The armholes were a pain because I had to sew the lining and outer fabrics right sides together, but with the garment right side out. This meant doing a sort of burrito with each armhole, the front and then the back, and sewing up toward the shoulder as high as I could. It's hard to explain this in writing, and I tried to show this in instagram stories when I was working on it but even there it was difficult to really show what was going on. Just know it was very annoying, slippery, and tricky, but I got it all together! And then I just had to sew the side seams - one big french seam going from the outer hem, through the armpit, and down to the lining hem on each side. Then I let it rest on the dress form for about a day and hemmed both layers. Done!

armhole burrito situation in progress, with little 1/4" seam allowances because that's how i roll.


I bought a beautiful necklace from Altar here in Portland to add a little interest and edginess to the front, got some shoes that matched the silk super well, and made this work for two weddings. Unlike last year's wedding guest dress, this one survived both and I still like it, so it's nice to know that it's still in my closet if I have another event to go to. If you're wondering about the bra situation with a low back like this, I bought some stick on pasties to cover any nipple show through and said "fuck it" to the idea that I need to wear a supportive bra with everything. This was definitely a departure from anything I'd worn to a nice event before, but I really felt great in both the relaxed shape and the open back. I'm excited to push myself out of my comfort zone more in the future, in terms of things i design and also wear.


Before and during wedding #1 in NYC (feel free to ignore the hotel room chaos surrounding me):


And wedding number two, at dusk in San Francisco. Yes I did style it exactly the same way, idgaf.


Thursday, December 14, 2017

2017 roundup: not-quite-Ginger jorts


After seeing just so many awesome Ginger Jeans floating around the internet, I vowed to finally make my own this year. I bought the pattern and the flares expansion (I will always and forever have a place in my heart for flares), plus the Closet Case jeans ebook to help with some of the construction and fitting parts. I even bought a Cone Mills denim kit, but I'm far too cautious to cut into that for my first jeans attempt.  My hip to waist ratio is pretty non-standard, and I've had a really tough time getting shorts I've made previously to fit through the butt. So I bought some cheaper denim with the right amount of stretch and decided to start with shorts so that I could focus on the hip and waist fit without using quite so much fabric in case they were unsalvageable. I had already printed the PDF pattern months ago, and I taped it together one evening and got to work figuring out which size to cut out.

The size chart put my waist at two sizes smaller than my hips, which made for some awkward grading between sizes across multiple pattern pieces (front + back, pocket facings, yoke and waistband). Then I compared the back crotch curve to the one on my decently-fitting pants sloper that I drafted and fit in patternmaking school, and they were way different. Given my previous issues with fitting shorts straight from the patterns, I started trying to modify the ginger pattern piece to match my sloper more closely, and I finally realized that I was just butchering the thing. What to do? Draft my own jeans, of course. (This is really my answer to every pattern woe I have, big or small, these days. No regrets!)

 
my sloper, compared to ginger after a few mods to try to get it closer to the same fit


I pretty much guessed at how much negative ease I needed to work with the stretch denim, but otherwise the drafting was pretty straightforward: trace my sloper, cut off the waistband, cut off a back yoke, draft some front pockets by using the Ginger pocket pieces as a reference for how the various pieces related. I drafted my own fly based on my patternmaking class, and the pattern pieces are slightly different from the ones used on the Ginger jeans, so I used my notes from class when I got to constructing this part. I used the back pocket and belt loop pieces as-is from the pattern, because I might as well take a shortcut where I can, when fit isn't an issue. From here I followed the jeans e-book for construction - since I based my pieces off of the Ginger pattern, the instructions worked great. I basted everything together for a fit check, which was honestly not as bad as I feared, made a few tweaks, and moved forward with sewing.

 
baste-fitting before taking them apart and sewing for real

At some point I decided I wanted to make a button fly for these, but my jeans notions kits were for zip flies, so I had to source some more buttons. TaylorTailor had me covered for some great jeans buttons and matching rivets - highly recommend!

The worst part of the construction process was the topstitching. I didn't yet have my Bernina, so I was constantly switching between regular and topstitching thread on a single machine. My machine was just awful at the topstitching part, jamming up, eating the thread, making big thread nests on the wrong side, and sometimes breaking needles. It was an ORDEAL and I definitely cursed out my machine several times and swore to never make jeans again. But then - they were done! And they were beautiful and I was so proud. I always really love hammering on hardware, so the rivets were a satisfying way to wrap up the shorts.


So, how are they? Pretty good, not perfect, but I'll take it. I did wear them a ton this summer - to picnics in the park, out in muggy NYC in August, to the blueberry patch with Tumbles. I love having a pair of high waisted shorts that go with seriously everything. Honestly my only complaint is a perpetual wedgie situation in the back, and I think I just need to make the crotch curve a little longer on future pairs (this is something that I think would have been far worse had I used the Ginger pattern, based on how the two pattern pieces compare, but I need to investigate more). They were also just a bit snug through the hips, but I've burned off some fat due to my newfound love, aerials, so they are just right now. I'm still planning to make some full length jeans but got caught up in other projects, so we'll see when I get back to those. Hopefully soon, as my RTW jeans are getting pretty worn out and I don't plan to buy more!

 
out in the wild - New York hotel, blueberry picking


I took some photos back in late summer when we had some spooky, smoky wildfire light for a few days. Also featuring: a linen tank top that I draped, then hated and hacked into a high-low crop top, and still don't really like but would love to replace with something better in a similar breezy linen!


And some in progress/detail shots:


sewn, pre-hardware installation. (they look so naked!)


And... the only photo I got of the delightful pocket cotton I used, plus my finished button fly!