Friday, January 22, 2016

Sewn: Black Lilou dress

Of the projects in Love at First Stitch... I skipped over blogging about the simple head scarf (and I've never worn it - I swear my head and hairline are not shaped right for things like that); I showed you my Margot PJs and Delphine skirt; finally blogged about the Megan dress and the three Clemence skirts I made. The next pattern in the book is the Mimi blouse, which is cute but 100% not my style (I like more fitted, usually stretchy tops - the boxy look does not do it for me). So I skipped that one. Which brings me to the last project in the book - the Lilou dress!


I really like the style and fit of this one - of everything I've made so far, it definitely feels the nicest. I think the main downside is that it feels a bit too nice - more of a party dress than an everyday dress. I used a really sturdy woven cotton, which makes it feel high quality but not necessarily extra fancy. I may keep my eye out for something a bit more glitzy and possibly make myself a holiday party Lilou someday, since that's really my main excuse each year to dress up.

The trickiest thing about picking fabric for this dress is that it requires 60" wide (instead of the more common 45" wide). I basically just looked around my fabric store until I found something that matched the description the pattern gave (medium-weight with body, I believe) and which was also wide enough, and solid black it was. I think this started my new routine of making each new dress pattern in black first, since plain black dresses are probably my very favorite thing to throw on in the morning and instantly feel put-together. I'm definitely having a black phase with my clothing and I love it.

It's been a little while since I sewed this (like.... August 2015), so I can't remember all of the details. I did spend some time on fitting the bust first - I made a muslin out of the lining fabric, I believe, and adjustments were mostly bringing side seams and darts in tighter, so I didn't need to cut new fabric for the final version.

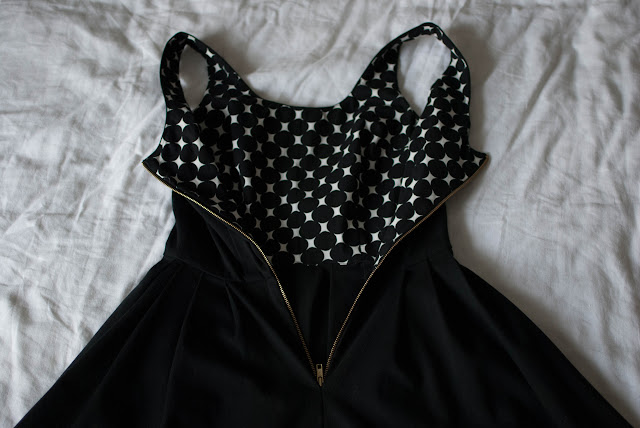
After many invisible zipper projects, I was over inserting them and decided to go with a regular zipper for this one. I worried a black plastic one would look cheap, so I got a metal coat zipper and I'm really happy with how it looks! My fabric is heavy enough that it all feels very stable, even with the extra heavy zip.


Some process shots...

Attaching the lining + outer bodice. This was really cool to learn! You attach all along the neckline and the arm holes, then connect the side seams for each the lining and the bodice, then do some magic and flip it all right side out and it's so cool, especially the very first time.


Close up of zipper attachment + pleats details - I really love how well this fabric holds pleats!


The downside of black is: really hard to photograph.


What I learned: How to line a bodice - this one is great because I've since learned that I hate using binding tape on arm openings and especially necklines, so sometimes subbing those out for lining is my best bet; pleats!; sewing a non-invisible zipper.

That's it for Love at First Stitch projects, but I wasted no time in moving on to other indie sewing patterns once I got through it all. More to come!

Also - thanks to Tim for taking all the photos of me wearing this dress! I liked so many that I had trouble narrowing it down :)


Sunday, January 17, 2016

Sewn: Clemence skirt (x3!)

This was my 4th big project from Love at First Stitch, the Clemence skirt. This skirt was really exciting because it was almost exactly like a black skirt I bought a few years ago and ModCloth and love - it's so simple and comfy and flattering and perfect with t-shirts. So I made one, and then two more! before moving on in my book.

My versions are a bit poofier than the ModCloth one, even though I tried to use the same circumference of fabric. I think this is because my cotton is pretty sturdy so it holds the gathers better. I mostly don't mind but occasionally feel a bit silly in them (only a bit though).

This skirt was interesting because it didn't come with a pattern to trace and cut, just instructions to make my own using my waist measurement. I have found that I like less ease in the waist (ie. I like things tighter than pattern makers expect me to), so I used my existing skirt to determine the waist circumference, and it worked out perfectly.

I like the simplicity in this one. After I got the hang of it, they are super easy to throw together even with pockets.

My first attempt at the Clemence was out of a gold cotton fabric and I made it exactly as outlined in the book, aside from measurement adjustments. This meant french seams (no raw edges showing!) and no pockets.

My only WIP pic of this one - this is how you do gathers! Lots of loose stitches, pull on the threads until it bunches up to the right size, then sew for real and remove all the basting stitches.


I did contrasting invisible zippers on two of these and I like them - I kind of wish they were more visible though! The chambray skirt (seen in a photo at the bottom) has a teal one, which I love the color of but it is almost too invisible. Oops.


French seams. You sew the ends together in one way, then flip it and sew it the other way to enclose the raw edges. So neat and tidy! The others don't have this because I'm not sure if there is a way to do these with seamline pockets.


My second one, with a fun print. I think it is the fullest one (you can see this in my terrible bathroom selfie, below). I like it when I'm in the mood for it...


Pockets! My book also outlined how to add these (as an optional step, so I skipped it in my first try). They are super hidden in the full skirt, and I made them big enough to hold my giant phone. Score!


Ugh these are apparently the only photos I have of me wearing the patterned and chambray versions of this skirt. Enjoy the mop and stall door, I guess. :|


Stuff I learned by making the Clemence skirt: simple pattern drafting; making and inserting side-seam pockets (this is really useful!!); how to sew French seams; and I guess, the joy of making a good pattern over and over!

I swear I'm going to try to get better photos of me wearing things going forward. But for now I'd rather get through a bit of my massive backlog of projects than wait even longer until I take all the photos. 

Sewn: Megan Dress

Whoops - remember that time I said I was going to blog about the stuff I've sewn? Wellll here is the first dress I ever made, only 6 months late. (Even the photos are that old! *hides in shame*)

This is the Megan dress from my intro book, Love at First Stitch. This one had lots of lessons along the way! And while I am really proud of the end result, I've worn it exactly once. I realized that just because I like how a dress looks in the photos that come with the pattern, that doesn't necessarily mean it's something I'll feel comfy commuting and sitting all day at work in. (And let's face it - I live in yoga pants on the weekends.)

I made a toile (aka muslin) for this dress, as with my Delphine skirt, and I used it to make a ton of adjustments. In fact, after I copied them all to the paper pattern, I ripped apart my whole toile and remade it with the changes, just to make sure it was good. This involved a shorter skirt, longer bodice, narrower hips, and less ease in the cap sleeves. The last one in particular was due to this sitch going on in my muslin:


A littttttle too Easter Sunday for me. So, I did some pattern surgery, got some cute fabric (from Cliff's Variety of all places), and got started on the real thing.


And here it is! I really like it in photos.... Not quite so much on. I've found the fabric is stiff enough that i kind of clings to my tights when I walk (and I really hate going out bare-legged - even in summer). It feels a little too tight on my hips and butt, although I'm not seeing it in these photos. Overall, something I would maybe wear out to dinner but not in my day to day life that usually involves running to catch a bus and carrying a corgi around a lot.

The sleeves are also not really my thing - I definitely prefer sleeveless dresses but wasn't ready to go rogue and try that without instructions to hand-hold me through it. The fabric and fit make it feel a bit less conservative, but it's still a bit stuffy-feeling compared to the dresses I feel the most "me" in.


But I have to say, I am pretty proud of the details. Invisible zippe, sleeve pleats (that are less intense than my prototype), nice fit through my curved lower back.


Pre-serger - everything is finished with the zigzag stitch on my sewing machine. There's a collar facing (shown below), which I'm a fan of, especially compared tot he common alternative: ~binding tape~ (one of a handful of things I absolutely dread in sewing projects).


What I learned: Making tons of muslin adjustments until the garment is just right, and transferring these back to the pattern; darts and dark tucks (darts are another item on my "least favorite things about sewing" list, but they make a lovely dress!); various common dress/top techniques like attaching sleeves and using a neckline facing for stability; gathering fabric (for the sleeves).

So, that's my Megan dress! I'm keeping it around in my closet a bit longer, partially because I'm a borderline hoarder, but I'm telling myself it might get some use this spring/summer? Maybe? What do you think? Would you wear it in your day to day life?

Monday, January 4, 2016

My girl

I took some pics of Tumbles while on a Christmas Eve walk and don't know what else to do with them so here you go <3

(the top left one is my fav.)