Saturday, December 31, 2016

2016, looking back

Wowowow, what a year 2016 has been. No exaggeration, I think it was the best year I've ever had for my personal life, and it certainly felt like the worst as far as world events go.

I was able to shake off some stagnancy I'd been feeling and make some long awaited changes in my life: I quit my career and started taking lots of patternmaking and sewing classes, I turned 30, Tim and I got officially engaged, and we bought a house in another state! The career change, moving out of California, and homeownership are all things I've been looking forward to for years, and it's so exciting having things all click around the same time (although my impatience has caused some misery over the last few years). I've been enjoying the busyness and I'm not quite ready for things to settle all the way. Fortunately I still have a cross-state move (and discovering the joys of homeownership), an elopement, and a business to start in the coming year (eep!), so things should be anything but boring.

I've also dubbed 2016 "the year of the weekend trip" for me. I went on two very different all women retreats where I knew no one going in (scary but more than worth the anxiety!!), a solo trip to a cottage in rural California with just Tumbles, a trip to Mexico with my BFF Alex, a long weekend in Portland to visit my other friend Liz, two more long weekends in Portland with Tim (one for house research and another for a wedding), plus two single-day Portland trips for house-related things. My longest trip was only about 4.5 days, but I'm hoping 2017 can be the year Tim and I actually take a real vacation together again.

Every December I like to look back at all the photos I took that year and remember the defining moments of each month—it's a reminder of the good things that happened, even amidst stress and anxiety, and it reminds me of how much change can happen in just a year.

January


January was a chill homebody month. I cooked and baked a lot, did yoga, hung out with Tumbles, and sewed some things that are still among my favorites to wear. It was good, but I was itching for changes, and fortunately it was my last really calm month of the year.


February


By far the highlight of my month was the Wildbride retreat. I'd been feeling depressed and stuck in a rut in various areas of my life, and it was just what I needed to start moving again. I made some wonderful, supportive friends and got some really cool photos of myself in the process, too. I left feeling inspired to make changes in my life instead of just feeling helpless and stuck forever.

(bottom left and top right photos by Liz Morrow Studios)

March


Wildbride inspired me to start making time for things I'm excited about, so in March I began leaving work early once a week to take patternmaking classes at Apparel Arts. As you probably know by now, I loved it. March was also the month we began our very long and stressful hunt to buy a home, and we connected with realtors and started searching in San Francisco.


April


I brought Tumbles along on my own little retreat in April, in order to get away from people, immerse myself in nature, and continue to think through where I want to go in life. It was a wonderful getaway and I really need to do this again soon. 


May


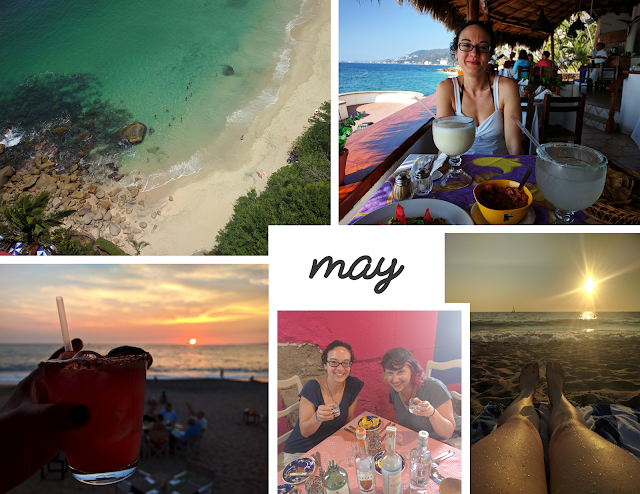
In May I got my very first intern at work, which kicked off a busy summer at my job. We also started house hunting more aggressively - basically every Sunday was spent going to open houses through the summer. At the end of May, I took a weekend to go to Mexico with my longtime friend Alex, and despite the heat (and massive sunburn), it was a fantastic escape from the stress of life and work.


June


June was a lot like January, with no real defining events or trips. Tumbles turned 2 and Tim turned 30, I started on my final skirts for patternmaking class, and we went to SF's corgi beach day with hundreds of other corgis. Work was still busy and the house hunt continued, but it was nice to have a relatively low key month in the middle of a crazy year.


July


In July I spent a long weekend with my friend Liz in Portland, and it was amazing. I had previously convinced myself that I couldn't bear the (relatively) hot summer weather there when I'm so used to SF's fog and July chill, but I embraced the joys of summer and fell in love with Portland (not for the first time).


August


August didn't have a lot going on on the surface, but there were some major changes starting behind the scenes. We began the process of switching our house hunt from SF to Portland, and I made plans to quit my career to pursue something totally different. At times it was excruciating keeping all this a secret from most people I knew, but we wanted to make sure plans were concrete before being more public about everything. I channeled some of my pent up energy into finishing up my two final skirts for patternmaking and making a tote bag that I've used a ton since.


September


This month was a huge shift for me. I left my job in tech after 7 years, and I began taking sewing and patternmaking classes full time. I was so incredibly happy to be able to focus my time and energy on something I love, but it was also much busier than I expected! Homework filled most of my weekends, and I had to relearn time management without the more concrete work/life balance I had previously with an office job.


October


My busiest month for sure! I started and ended the month with short trips to Portland, and in the middle I flew across the country to attend Camp Workroom Social where I made tons of sewing friends and learned to sew my own bras! I also had a full course load (5 classes + homework) and was sick for much of the month, including a nasty bout of strep. We finally found a house we loved enough to make an offer on, and it was accepted! In the midst of all that, I turned 30 and got galaxy hair colors to celebrate.


November


Things settled a little, and as classes started wrapping up I finally had time to make a dress for a lovely wedding I attended right before Thanksgiving. This month was also heavily colored by the presidential election, and I had a lot of really rough days related to that. A bright spot amidst the stress, I had a gorgeous ring custom made, which pushed my and Tim's eventual elopement plans into "officially engaged" territory.


December


Ah, December! We finally closed on our new home in Portland after being consumed by the house hunt and then the closing process for most of the year. We flew up to get the keys as a day trip, and there was snow on the ground when I first saw my very own house - it was perfect. The rest of the month was relaxing almost to the point of boredom, which is probably for the best, since things are going to pick up again really soon....


2017


The next few months feel sort of like a holdover from this past year. I'll be taking one more set of classes in the bay area through mid-April, and immediately after that we plan to move, assuming some house renovations all go as expected. At that point I'll be in a new city, in a new house, trying to make it feel like home.

I'm so excited to really put some effort into this house, after so many years of cramped San Francisco rentals with awful beige paint and absurd monthly rent. There's going to be a lot to do—the new place is several times larger than our current one, which means there will be a lot of empty space to start. I'm ridiculously pumped about having ample closets and storage space (!!!). I'm looking forward to eventually buying things that I don't have room for now: a full sized sofa, lots of house plants, storage and tables for my dedicated sewing room, full-length mirrors, and maybe a dress form.

At the same time, once I finish classes it's time to stop procrastinating on figuring out my next career move. I'm hoping to start by making patterns for home sewers, and we'll see what develops from there. While I'm getting a solid technical understanding of drafting and fitting patterns, there is so much about running a business, creating and selling digital or physical goods, and marketing that I just don't know yet. It's going to be a huge learning curve, but one I'm excited to figure out.

In lieu of resolutions this year, I made myself a list of smaller, concrete things I want to accomplish - stuff like finally having a small herb garden and getting strong enough in yoga to do a handstand without the support of a wall. But mostly, I'm excited about the knowns and unknowns of the next year, excited to stay busy, work on my career, and connect with old and new friends (and my little family) up in my new city. As scared as I am about the world in this next year, I think it'll be a good one in so many ways. Happy 2017, friends! ♥

Monday, December 5, 2016

Vintage Vogue 5701 dress construction


I recently posted photos of this cocktail dress, made from a vintage Vogue pattern. You can see more of the finished dress here! This is the companion post, all about the construction, resizing, and lessons learned from the process (and tons of photos). This was my first vintage pattern, and the fanciest piece of clothing I've made, so there were definitely many lessons :)

When I first found the pattern online I didn't see it in my size (and in fact, the largest size they made would have been just large enough, with a 28" waist). I went ahead and ordered, figuring I could make it work. I had four months to resize and fit a muslin, then figure out the vintage construction techniques and give it the care and attention it deserved. And then, life happened - big changes, full time classes and homework, several weekend trips thrown in the mix, and whoops, we were a few weeks away! But I was determined, and spoiler: I finished just in time.

I didn't see anything online about another modern sewist making this dress yet. If you're giving it a shot and have any questions, please comment or reach out on twitter/instagram!

The dress


The pattern is Vogue 5701, from around 1963. It has a fitted bodice with darts for shaping in the front and the back, a fairly full pleated skirt, and inverted pleats at the sides, which are made from separate skirt panels. The pattern includes ankle- and knee-length versions of the dress, plus a petticoat and a jacket. I made the shorter dress and neither of the other pieces.


Supplies


By some miracle of planning ahead, I did manage to pick out the fabric with time to spare. I decided to try a nice textured dupioni silk, and I ordered a few swatches from fabric.com before settling on a medium gray color (here). A little boring, perhaps, but also classic and very wearable for my next several years of special occasions! And I loved the color for a cozy fall wedding in Portland, without it being an exclusively fall/winter dress. I ordered the yardage and then let a couple more weeks pass before I was really in a time crunch. Fortunately Britex pulled through with the lining (plum Bemberg rayon) and petticoat net as well as a ridiculous amount of notions. (There is no finished petticoat, but I do have the supplies!)


Fit


At this point the wedding was two weeks away, travel had finally subsided and I was more or less caught up on homework, so I got to fitting. I tried to unscientifically grade the pattern up by hand so it matched my normal bodice measurements, and this didn't turn out great. The darts were in very strange places and it just didn't curve over my body like it should.

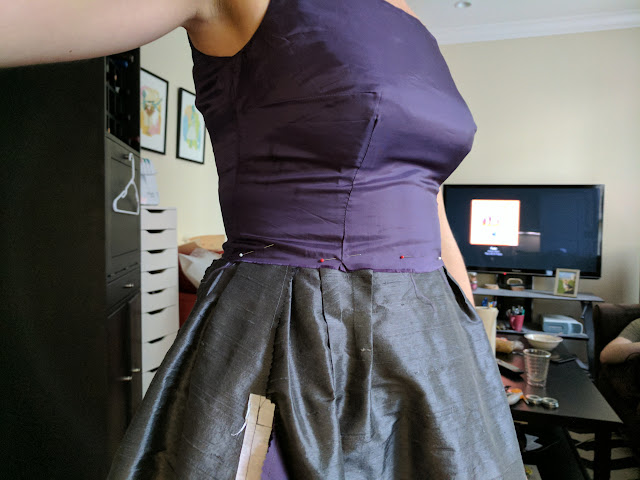
By now I had my very own bodice sloper from patternmaking class. I'd just wrapped up the dart manipulation section (ie. moving darts from one place to another to retain fit but create different styles lines). I decided it'd be easier to just redraft the thing to my measurements, manipulating the darts and armholes/necklines to look like the original pattern's. I then had to slash and spread the skirt pattern pieces to match the new bodice waist, and I cut and sewed the whole thing up in muslin, including zipper, because with this little ease, it's pretty impossible to see the real fit without the zip. This was way better than muslin #1! But I overcorrected and had more ease than I wanted - it was loose and the skirt pulled everything down at the waist.

I made some adjustments - took out ease at the side and shifted darts a bit - and sewed a new bodice. Almost there! I made a couple more minor adjustments, then updated the skirt again to match the waist circumference and ensure the skirt pleats and bodice darts lined up as in the original. This muslin was just what I was hoping for. It also gave me the opportunity to settle on the length I wanted, which ended up being 2" shorter than the pattern called for.


a little too big

bodice iteration

Construction


Time to sew! The vintage instructions were sparse in a few places ("insert a lapped zipper"), and in other spots I knew a better way to do things, so I was really glad I didn't dive into this a year ago when I was just getting started. I did still make some mistakes and learn a lot - so many things to do better in the future! Not knowing whether I would need the petticoat, I started with the dress itself, and by the time I attached the skirt and inserted the zipper, I could tell there was plenty of volume for me to skip the petticoat altogether, unless I wanted to go full retro.

I just finished taking a construction class at my sewing school, and at the start I wasn't sure how useful the class would end up being since I taught myself a lot of things over the last year and a half (thanks, internet). This dress alone was justification for the class! I used tailor's tacks to mark darts and pleats on the tricky fabric (so. many. tailor's tacks.), made my own piping, installed a lapped zipper sans instructions, and used two types of hand sewing - all things I learned in my construction elective.

basted pleats and tailors tacks


My biggest frustrations came from the fabric choice. My lining is a beautiful cupro (Bemberg) rayon, which is shifty and slippery but manageable for just lining the bodice. Then I moved on to the silk, thinking things would be smooth sailing, and boy was I wrong. The fabric has a nice texture, so it held in place pretty well, but wow that dupioni frays like nothing I've sewn with. I gave myself only 1/2" seam allowances, which was a mistake because I lost about that much at the bottom of the bodice due to fraying (practically dissolving, it felt like). By the time I hemmed the skirt (the last step), it had lost a full inch in some places. Fortunately I had 3" hem allowance to start so this wasn't a major tragedy. I'm still finding long silk threads around my house.


I also had a near disaster with my skirt at one point: as I was pinning the raw edges of the skirt and bodice to be stitched up under the lining at the waist, I discovered that one section of skirt pleats had frayed completely past the stitch line and away from the bodice - ie. there was a gaping hole forming at the waistline. I definitely screamed some curse words and had a mini freakout (this was the weekend before the wedding, no time to regroup!), and then worked some magic with a seam ripper, iron-on interfacing, an extra patch of the silk, and a few extra rows of stitches. And... I think it turned out pretty okay, to my surprise! Definitely not noticeable from the outside, and it didn't rip open during my one evening of wearing it. Success.

The fraying was mostly an issue across the width of the fabric, and most of my seams were lengthwise or on the bias, so I just used pinking shears on the edges. I usually serge or do french seams, but this seemed fitting with the vintage pattern and lighter fabric. In hindsight, I should have finished the seams with more seam allowance and with a finish that would strengthen the fraying fabric.

I finished all but half of the hem before we flew out the day before the wedding, and I wrapped up hand stitching the hem an hour before the ceremony (cutting it close for sure, but I knew it wouldn't be difficult once I made myself sit down and do it, so I wasn't too panicked). I threw it on with an old pair of heels, after unsuccessfully shoe shopping the day before, and it was everything I'd hoped it would be, despite my months-long procrastination.

Details


The bodice is fully lined. At first I used the instructions from the pattern: sew side seams, attach lining + bodice at neck and arms, then flip right-side out and sew the shoulders together from the inside out. The shoulder sewing ended up looking messy and it was difficult to do well, so I regrouped, ripping out the side seams and using the magic "through the shoulder strap" method I learned from the Lilou dress instructions in Love at First Stitch. This worked fantastically, even though my seam allowances and understitching had seen better days, and I made a note to do it this way from the start if I make this dress again.


inside out, pinning the lining


In assembling the skirt, of course I added the #1 bonus of making your own fancy dresses: POCKETS. They're basic side seam pockets, inserted in the seam between the front skirt and the side pleat inserts. They're extra hidden because the seam is inside an inverted pleat, but they're still easy to access. These are made from the same rayon as the bodice lining - oh so soft and smooth!


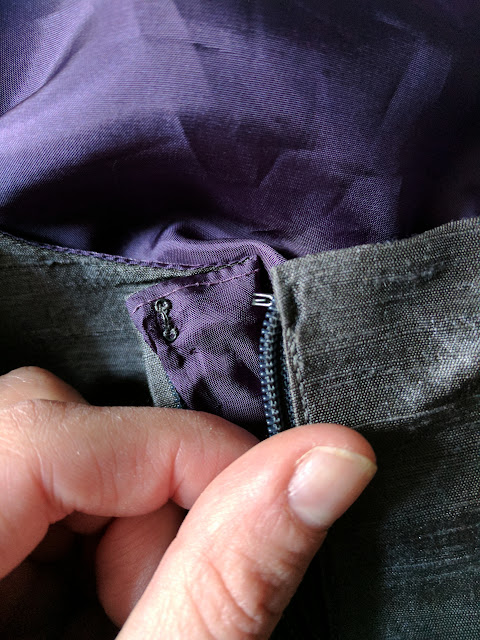
I made and attached matching piping to the bodice waist, and I'm pleased with the subtle touch it adds. The skirt was sewn onto the bodice, and it was lapped zipper time. This went off surprisingly well, given that I'm still new to lapped zippers and this was my first in anything other than muslin. I wanted to use a standard zipper rather than an invisible one, since the dress is pretty tight and may take some strain, and I think the lapped zipper looks pretty profesh if I do say so myself. The zipper doesn't quite match (they had almost the perfect shade, but not long enough for my dress), but since it's hidden behind the lap I don't think it's very noticeable.


After I inserted the zipper, I turned the edges of the bodice lining under and hand stitched them to the zipper using a prick stitch. It was tedious but is almost invisible and let me avoid figuring out to how machine-sew a lining inside a lapped zipper. (I feel like this might be straightforward, but at this point I wasn't up for trial and error). The raw edges of bodice + lining + skirt are sewn up under a grosgrain ribbon at the waist. I pinned everything together and stitched in the ditch at the front waistband, and aside from the previously mentioned skirt drama, this worked really well and the stitching is hidden by the piping on the outside.

teeny tiny hand stitches down the right side!


I sewed a little hook and eye at the top of the zip, decided to skip the oh so retro shoulder bows included in the pattern, and all that was left was the hem! I kind of followed the instructions, which said to use ribbon seam binding, ie. I bought something that seemed appropriate at Britex and made up a technique that seamed to make sense. I measured up from the totally frayed edges to sew the ribbon 1" from the original edge, then pinked the excess fabric off and pinned up to take the rest of the 3" hem allowance up.


I didn't want a row of hem stitching to be visible, so I hand-stitched the entire hem. Friends, I never thought I would say those words. I hate hand stitching and will generally do anything I can to make things work on my machine. But when you've put this much time and money and care into a dress, you make sacrifices, and I have to admit it looks really great now that it's done.

finished hem inside


finished hem - invisible on the outside!

Cost


I'll break down what I spent on this dress, since I always find it interesting to compare to ready to wear prices.

4 yards of dupioni silk: $90 (but I do have a yard or so left over - I wanted to err on the safe side)
3/4 yard of bodice lining + 1 1/2 yards unused petticoat fabric: $33
lots of notions (zipper, 3 types of ribbon, hooks and eyes, unused horsehair braid for the petticoat, thread): $17

Total: $140, or somewhere closer to $100 if I make it again and don't overbuy!

This isn't factoring in the cost of my time, but given that I'm a full time student right now anyway, and this was a huge learning experience (and a lot of fun), I'd say it was worth it despite not necessarily being a financial "win". And you know, that $150 party dress you buy at the store probably doesn't fit your body perfectly, or come in exactly the color + fabric + silhouette you imagined. Basically, this sewing thing isn't the worst even when it's not cheap.


Epilogue


After all that time and money and effort, the dress is pulling apart at one of the side seams, and I don't particularly trust it to hold up through another party. I'm not very surprised that it's coming apart at that seam. This is where I ripped the seams out, after pinking the seam allowances down to almost nothing, and resewed again later, which is bad news on a fabric that's already very prone to fraying. I really like the silhouette, fit, and fabric choices, though, so I'm strongly considering buying enough fabric to make another. I would use some silk organza as underlining for the dupioni silk on the entire dress, which should help reduce fraying and take some of the strain off the duioni, and I would use larger seam allowances and probably finish my edges better (french seams, hong kong seams, or even just the serger?).


Thanks for reading this doozy of a post, and thank you especially to everyone who followed along on instagram/twitter and asked about/complimented this labor of love <3 I'm so happy to have friends who are excited about the things I'm working on!

Saturday, December 3, 2016

sewn: vintage vogue 5701 dress


For 4 or 5 years now, I've worn the same two dresses over and over to any and all "nice" events (weddings, work holiday parties, things like that). They're both decent dresses, but at some point you've gotta change it up a bit. But every time I'm invited to such an event, I completely forget that I need a dress update until the night of, when I look in my closet and feel a tinge of despair. Until now!

This summer I was invited to my friends' wedding, happening the weekend before Thanksgiving, and I vowed to do something about this dress situation. None of the indie patterns I've seen out there were quite what I was looking for, so I decided to go all out and find a lovely vintage cocktail dress pattern—something sleek with a 60s silhouette and a knee-length skirt. I found this pattern that I adored: Vogue 5701, from around 1963. I had four months to resize the pattern, get the right fit, buy supplies, and make the dress, but of course I waited until three weekends before the wedding to actually start most of that. I'll go into more info on all of that (with way more process and detail photos) in a separate post. For now, the finished dress!


pockets (not in the original pattern, but very crucial)


A photo from the dress's inaugural outing at the wedding a couple of weeks ago! The rest were (finally) taken today on my back patio at home.

shoes from ModCloth, back when I worked there (circa 2011)

Monday, October 24, 2016

melilot dress hack


phew. I made a dress! I'm still very excited about my life choices, but dang, I have a lot less free time than I expected. I'm spending a lot of time on classes and homework, and travel, and being sick.... and verrrrry little time on sewing for fun. I need to seriously work on my planning and time management (and my immune system?) so I can complete more actual projects. But I did finish this dress that I started way back before I left work (ie. early September). It's based on the Mélilot shirt by Deer & Doe.

I set out to make a plaid short sleeve version like the example shown on the site. I made a muslin, things looked good, I was ready to go... and then I decided I needed it in dress form instead. So I hacked the pattern a bit, made 3 more muslins, and then finally started sewing up the real thing, in a totally different fabric. I'll probably still make that plaid shirt someday soon, although a part of me really wants it in dress form too... Ah, indecision!

To change the pattern into a dress, I started by cutting the pattern front and back straight across, just above the highest part of the bottom hemline, in order to keep the waist and hip curves intact - essentially just bringing the hip width straight down for several inches. It was still very snug around the hips (a dress requires more ease for walking than a hip-length shirt does), so I widened the side hips a little more with a few different tweaks. I also added back darts on either side to take it in at the smallest part of my back. The bodice still fits more loosely than most things I own; I have a tendency to buy on the small side and over-tailor when I sew. But I'm happy with the balance I struck between a well-fitting garment and enough ease to keep it casual and comfortable. Once I got the silhouette worked out, I also re-spaced all of the buttons so that they're less dense than on the shirt version.

iterations


backsides of my adjustments

The dress is made out of what I think is a lightweight cotton chambray. I got it from my local discount fabric store so the content is a bit of a mystery. I used navy topstitching everywhere to break things up ever so slightly, and I went with natural wood buttons for a little more contrast. I used french seams everywhere, as suggested in the pattern. I always hate french seams as soon as I start doing them (why the extra pressing and sewing step when I could just serge??), but it does look really nice with no exposed seams, so I'm happy. I made self bias tape for the inside of the hem, because I've had bad luck with turning up curved hems and getting them to lay flat. I haven't washed and dried it yet, but so far the bias tape seems to be doing the trick.

I have actually never sewn a button-up shirt or a shirt dress before! This was my first collar + stand, and it was pretty straightforward, although I did reference a tutorial (here) to make sure I got everything in place correctly. My topstitching is a little wonky on the stand (you can see it in the photo below) but ehhh, I'm just going with it.


I brought this with me on a recent trip to Portland, and it was perfect in the early fall weather (shown in a couple of photos with the cardigan I made from a heavily modified Plantain t-shirt pattern).

back darts in action


I can tell the next few months are going to be very busy, but I'm really going to try to sew more (I miss it!) and blog when I do. I'd love to have a more regular cadence here. And I actually have plans for fall sewing, in the hopes that concrete goals will help me get started! Hint: there's a vintage cocktail dress in the mix, as well as some Closet Case Files patterns that I've been wanting to try out for ages.... Fingers crossed that I can knock out at least three things before winter comes along!